The Williams & Hussey Molder is best known for producing custom profiles but also functions as a powerful planer. With a few quick adjustments, your molder can help you reduce material thickness and prepare boards for profiling without needing a separate machine.
When Do You Need a Planer?
Whether building custom cabinetry, restoring historic trim, or working with rough stock, a planer is essential. It allows you to:
- Flatten and smooth lumber
- Achieve consistent thickness across boards
- Prepare reclaimed wood for reuse
- Get material to the exact dimensions you need before molding
If you’re already using the Williams & Hussey molder for profile cutting, turning it into a planer helps maximize your investment and frees up shop space.
Why Use Your Molder as a Planer?
Using your existing equipment as a dual-purpose machine has several advantages. The Williams & Hussey Molder is precise, compact, and easy to adjust, making it ideal for smaller runs and custom planing work. Instead of buying a separate planer, you can achieve excellent results with what you already own.
The most important step in using the molder for planing is reducing roller tension. Back off all four pressure screws by ¼ inch. This allows the material to feed smoothly without excessive pressure.
Step-by-Step Instructions for Planing
- Measure the Stock
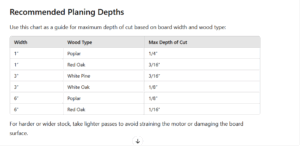
Start by measuring the thickness of your board. The depth of cut per pass will depend on the wood species, width, and moisture content. (Refer to the chart at the end for specific recommendations.)
- Adjust the Planing Head
Loosen the planing head locking knob (Part #54-21). Then, use the elevating handle to lower the head so it sits 1/32 inch below the measured thickness of your stock. One-third of a turn on the handle equals roughly 1/32 inch. Once it’s set, re-tighten the locking knob to secure the head in position.
- Reduce Roller Tension
Back off all four pressure screws by ¼ inch. This pressure reduction is crucial for planing. Without this step, the rollers may grip the board too tightly, leading to uneven feed or poor finish.
- Install the Chip Extractor
Make sure your chip extractor is installed correctly. The front lip should be engaged into the planing head, and the locking pin should be securely seated. The chip extractor provides good dust and chip removal to keep the machine clean and running smoothly.
- Use a Guide When Edge Planing
If you’re planing the edge of a board, use a high, square, relieved guide to help keep the stock straight. A relieved guide (with a slightly hollowed vertical face) reduces friction and helps maintain alignment.
Recommended Planing Depths
Final Thoughts
The Williams & Hussey molder is more than just a profiling machine. It becomes a capable planer with a few simple adjustments and saves you time, space, and money. Whether you’re a professional woodworker or a small shop owner, planing with this machine helps you get more out of every board and every project.
If you’re unsure about setup or want help choosing a guide, contact our team. We’re happy to help you get the most from your machine.